Measuring instructions
What you need
Tool
 Screwdriver (cross or safety screw T20H)
- Optional: cell phone camera or camera
Parts
- Your finished sensor with Velcro straps
- Possibly more Velcro straps (for thicker lantern masts)
- (Safety) cable ties
This is how it works
Before and after hanging up
- As soon as the sensor is connected to the battery pack, it starts recording. If possible, connect the sensor on site first and disconnect it immediately after the measurement so that no unusable data is recorded during transportation to the installation site. We are working on a solution that allows you to switch the sensor on and off from the outside.
- Find out beforehand or on site which speed limit currently applies and whether there are any other special features (roadworks, etc.). You must specify this when uploading.
Generate usable data
The sensor should be mounted at chest height, at a 10° angle to the road and pointing away from intersections.
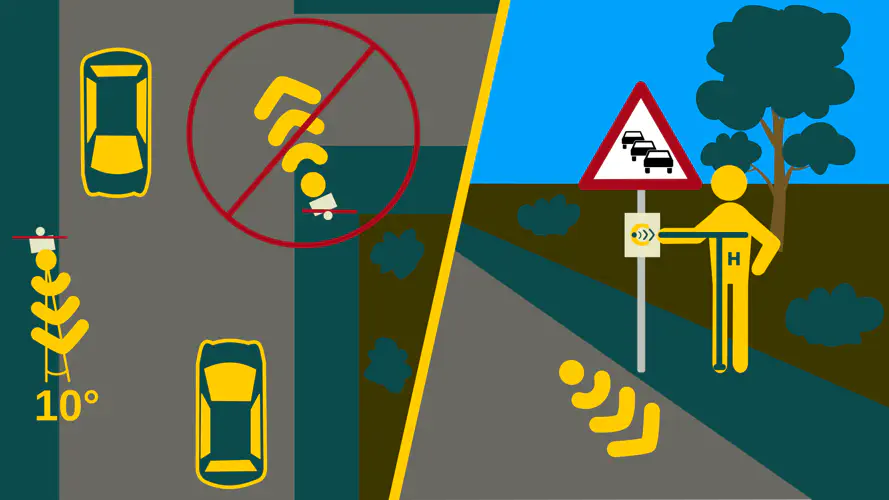
- The sensor must be mounted as close to the roadway as possible and at approximately chest height. It should also point towards the road at an angle of about 10°. The poles of traffic signs are best suited for this (the Velcro strips described in the assembly instructions are also sufficient for this diameter). However, the sensor should never cover a traffic sign
- The alignment should always point away from intersections or driveways to avoid incorrect measurements.
- The sensor detects vehicles in both directions. This works best when there are no traffic islands or other obstacles in the middle of the road.
- Only a straight stretch of road provides reliable measurement results. Bends should be avoided.
- Even if the sensor detects both directions of travel, you must remember the direction in which the sensor is pointing and specify it later when uploading.
Anti-theft device
- The adapter plate has a recess in the middle to prevent theft. Here you can either thread through a normal cable tie (not a major obstacle) or the Hip Lok Z security tape (linked in the shopping list) for more theft protection.
- Depending on the local conditions, it may of course help to position the sensor as inconspicuously as possible (e.g. on the back of street signs). However, make sure that good measurements (see above) are still possible.
Take photos
Photos of the suspended sensor help us to get an impression of the conditions at the location. They also allow comparable measurements to be taken at different times, as the sensor can be hung up in exactly the same way. The photos can later be uploaded to the platform together with the data for the respective location.
**The photos should be taken in such a way that the environment around the installation site can be recognized. Care must also be taken to ensure that no personal data (recognizable road users, license plates) is recorded or made unrecognizable before uploading.